How To Blend Eyeshadow: The Secret
Mastering the art of eyeshadow blending is a game-changer in any makeup routine. The right techniques and tools can completely transform your look, enhancing your eyes and giving them depth and dimension. In this comprehensive guide, we’ll walk you through every step of blending eyeshadow like a pro. Whether you’re a beginner or an experienced makeup enthusiast, you’ll find valuable tips and tricks to elevate your eyeshadow game. We’ll start with the lightest colors in your crease and gradually build up to the darkest shade, adding shimmer and highlight for a truly polished finish. So grab your brushes and palettes, and let’s dive into the world of eyeshadow blending!
Step 1: Start with the lightest color in your crease.
The crease of your eyelid is a perfect place to start your eyeshadow application. Using the lightest shade in your palette sets the base for a smooth transition between colors. A matte shade similar to your skin tone can work wonders as a base. This step allows you to create a seamless gradient as you layer more vibrant hues on top.
To apply the lightest color, use a fluffy blending brush to sweep the eyeshadow across the crease. Use light, windshield wiper motions to diffuse the pigment softly. This technique ensures a balanced foundation and prevents harsh lines later in your application. Starting with a light hand is key, as you can always add more intensity if needed.
Step 2: Follow with the next lightest color in your crease.
Once you’ve established your base, introduce the next lightest shade into the crease. This color should be a few shades darker than the first, bringing in more depth without creating a stark contrast. By layering gradually, you build dimension while maintaining a natural gradient.
Use the same technique as before, employing a clean blending brush to apply the color. Blend it out slightly above the first shade, focusing on the outer two-thirds of your crease. This application technique elongates the eye and helps in creating a more dramatic look. Remember, patience and light pressure are your allies in achieving a flawless blend.
Step 3: Add the darkest shade to your crease and lower lash line.
The darkest shade in your palette adds drama and sophistication to your look. Apply this color with a denser, smaller brush to focus the intensity exactly where you want it. Concentrate the darkest shade on the outer ‘V’ of your eye, which includes the outer crease and a bit of the outer lid.
Next, apply the same shade along the lower lash line using a smudging brush. This step ties the entire look together and balances the eyeshadow on the eyelid. Be sure to blend any harsh lines, using back-and-forth motions to achieve a cohesive look.
Step 4: Add the shimmer shade to the center of your lid.
Shimmer shades draw attention to the eyes and give them a captivating sparkle. Using a flat eyeshadow brush or your fingertip, press the shimmer pigment onto the center of your eyelid. This technique creates a spotlight effect, making your eyes appear larger and more awake.
Packing the shimmer on with a fingertip provides maximum pigment payoff. However, if you prefer a softer shimmer, a damp brush will suffice. Make sure to blend the edges where the shimmer meets the matte shades, ensuring a seamless transition and avoiding any visible lines.
Step 5: Apply the darkest shade, one more time.
Reapplying the darkest shade intensifies the look, reinforcing the depth you created earlier. Focus this second application on the outer corner to define the eye shape further and to blend it with the shimmer shade.
Use a small blending brush and go over the areas where you previously applied the darkest color. This step adds definition back to the corners that might have been overshadowed by the shimmer. Be meticulous in blending to ensure the dark shade seamlessly integrates with the rest of the colors.
Step 6: Apply highlighter to brow bone and tear duct.
A well-placed highlight can lift and brighten your entire look. Applying a lighter, shimmery shade beneath the brow bone and in the tear duct area highlights these features, giving your eyes an uplifted appearance.
Use a small, precise brush to apply the highlighter. Opt for a shade that complements your skin tone but has enough shimmer to catch the light. The reflection here should be subtle yet effective, providing a contrast to the matte shades used elsewhere on the lid.
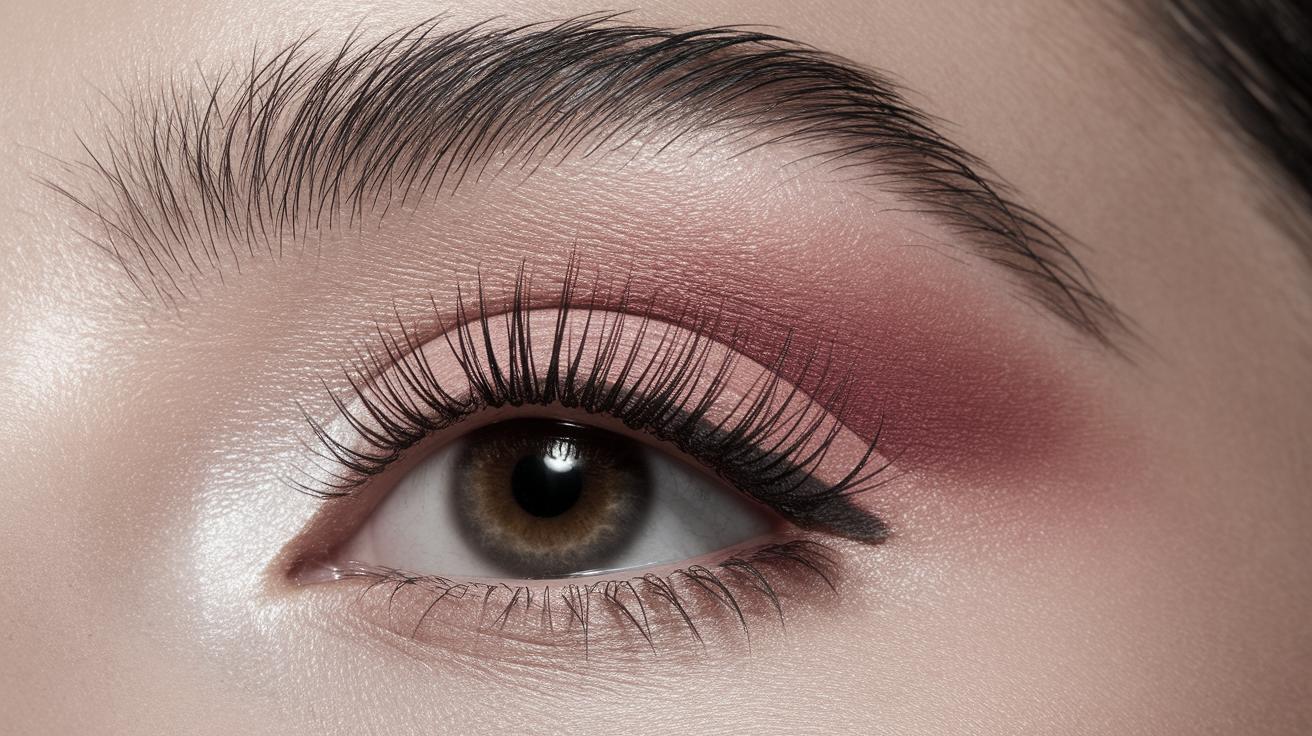
Step 7: Blend/Buff out.
Blending is arguably the most critical step in creating a flawless eyeshadow look. It’s the difference between a professional appearance and an amateur one. Take a clean, fluffy blending brush and gently buff the edges of all colors applied, focusing on areas where colors meet.
This process eradicates harsh lines, creating continuity between shades. Long, gentle strokes are essential to preserving the color placement while ensuring each hue transitions smoothly into the next.
Step 8: Apply eyeliner, mascara, and lashes.
With your eyeshadow perfectly blended, defining your eyes with eyeliner and mascara is the next logical step. Choose a liner that matches your desired intensity; a winged liner can add drama, while tightlining can enhance subtlety.
Finish with a few coats of your favorite mascara or consider applying false lashes for added volume and length. The lashes frame your eyes, bringing attention to your beautifully blended eyeshadow look. Adjust the style based on the occasion, opting for natural or dramatic lashes as desired.
Step 9: Strut your stuff.
You’ve mastered the art of eyeshadow blending, now it’s time to show off your handiwork. Step into the world with confidence, knowing your eyes display depth, dimension, and artistry.
Whether you’ve attended a glamorous event or simply embraced a polished day look, blending eyeshadow can significantly boost your self-assurance. Share your look with friends, or take it a step further by experimenting with new color combinations and styles.
Next Steps
| Step | Description |
|---|---|
| Step 1 | Start with the lightest color in your crease to set a base. |
| Step 2 | Add the next lightest shade for added depth. |
| Step 3 | Introduce the darkest shade for drama in the crease and lash line. |
| Step 4 | Apply shimmer to the center of the lid for sparkle. |
| Step 5 | Reapply the darkest shade to define the outer corner. |
| Step 6 | Highlight brow bone and tear duct for brightness. |
| Step 7 | Blend shadows to ensure a seamless finish. |
| Step 8 | Complete the look with eyeliner, mascara, and lashes. |
| Step 9 | Embrace your look and exude confidence. |